A good friend of mine gave me his not-needed notebook (HP Pavilion dm3-1130us) since my 10+-year-old notebook started acting up and became unstable. It got a dual-core AMD chipset with 64bit support. Good enough as a spare machine for the road.
I have been a Slackware user for a while and that's what I use on my home system and old notebook. But for this time, I wanted to try other distributions. After a quick research, I decided to go with Arch Linux. I liked its philosophy and simplicity. It seems very stable as well. That's a plus.
Don't get me wrong, I'm still a fan of slackware. I just wanted to see what else is out there.
I decided to use LVM for Arch Linux because I want to try full system encryption (dm-crypt with LUKS) later on. It seems LVM on LUKS is a growing preference nowadays.
Disclaimer:
Information below is gathered mostly from the Arch Linux Wiki page and changed here and there for my liking. This information below is solely used for my purpose and may not be suitable for others.
Configure Wireless Network:
Network connection needs to be configured before the installation can take a place. Since my notebook uses WiFi, I need to configure wireless network.
Check for the network interface and whether udev has loaded the driver.
# iwconfig
--------------------
eth0     no wireless extensions.
lo       no wireless extensions.
wlan0    IEE 802.11bgn  ESSID:off/any
         Mode:Managed  Access Point: Not-Associated  Tx-Power=14 dBm
         Retry long limit:7  RTS thr:off  Fragment thr:off
         Encryption key:off
         Power Management:on
It looks like wlan0 is available.
Interface activation:
Not required for mine but here is how to activate
# ip link set wlan0 up
Access point discovery:
I know my network information like ESSID, Encryption key, etc..., but here is how to list available access points
# iwlist wlan0 scan | less
Or, for the new netlink interface
# iw dev wlan0 scan | less
Association to the access point
Now a configuration file, /etc/wpa_supplicant.conf, needs to be created for my access point.
# vi /etc/wpa_supplicant.conf
--------------------
ctrl_interface=DIR=/var/run/wpa_supplicant GROUP=wheel
eapol_version=1
ap_scan=1
fast_reauth=1
These options are explained in /etc/wpa_supplicant/wpa_supplicant.conf
Append the passphrase and PSK to the file
# wpa_passphrase SSID_NAME "PASSPHRASE" >> /etc/wpa_supplicant.conf
Manual connection:
The WiFi interface should be up by the earlier command ip link set wlan0 up, so now tell wpa_supplicant the driver (wext - Linux Wireless EXTensions), the SSID specified in /etc/wpa_supplicant.conf and the wireless interface.
# wpa_supplicant -B -Dwext -i wlan0 -c /etc/wpa_supplicant.conf
- -B : Run in the background
- -D : Driver information. Default is WEXT
- -i : Wireless interface
- -c : Configuration file
Request an IP address to DHCP server.
# dhcpcd wlan0
Check assigned IP address.
# ip addr show wlan0
wlan0:  mtu 1500 qdisc mq state UP qlen 1000
 link/ether 00:00:00:00:00:00: brb ff:ff:ff:ff:ff:ff
 inet 192.168.1.6/24 brb 192.168.1.255 scope global wlan0
 inet6 fe80::ffff:ffff:ffff:ffff/64 scope link
    valid_lft forever preferred_lft forever
Load the module:
dm-mod needs to be loaded before doing anything with LVM
# modprobe dm-mod
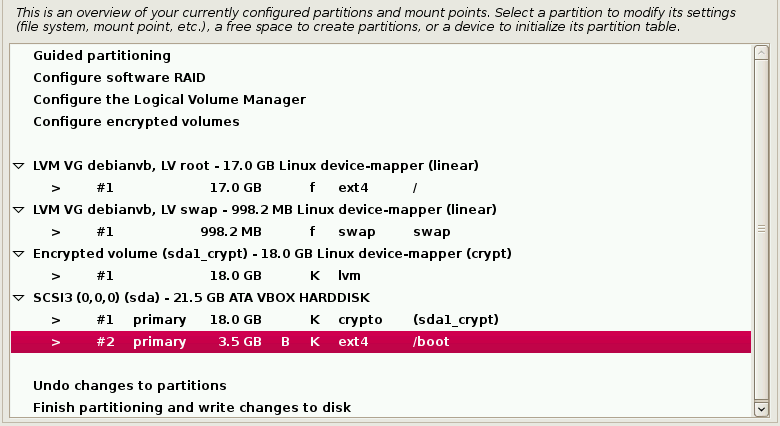
Partition a Disk:
# fdisk /dev/sda
Partition Layout:
/dev/sda1 -> LVM
Since I'm using GRUB2, the /boot partition is also included in the LVM partition.
Create Physical Volume:
Initialize these partitions so they can be used by LVM.
# pvcreate /dev/sda3
Create Volume Groups:
Create a volume group on this physical volume. Volume group name is lvm.
# vgcreate lvm /dev/sda3
Create Logical Volumes:
Create logical volumes on this new volume group.
# lvcreate -L 100M -n boot lvm
# lvcreate -L 10G -n root lvm
# lvcreate -L 500M -n swap lvm
# lvcreate -l 100%FREE -n home lvm
Configure block devices, filesystems, and mountpoints:
# mkfs.ext4 /dev/mapper/lvm-boot
# mkfs.ext4 /dev/mapper/lvm-root
# mkfs.ext4 /dev/mapper/lvm-home
# mkswap /dev/mapper/lvm-swap
# swapon /dev/mapper/lvm-swap
# mount /dev/mapper/lvm-root /mnt
# mkdir /mnt/boot
# mount /dev/mapper/lvm-boot /mnt/boot
# mkdir /mnt/home
# mount /dev/mapper/lvm-home /mnt/home
If there are no logical volumes under /dev/mapper, run next commands to bring up the modules and to make volume group available:
# modprobe dm-mod
# vgscan
# vgchange -ay
- vgscan: Scans all disks for volume groups and re-builds caches
- vgchange -ay: Makes the logical volumes known to the kernel
Select installation mirror:
Before installing, you may want to edit /etc/pacman.d/mirrorlist such that your preferred mirror is first. This copy of the mirrorlist will be installed on your new system by pacstrap as well, so it's worth getting it right.
Install the base system and other package groups:
The base system is installed using the pacstrap script. pacstrap is a script that installs packages to the specified new root directory. If no packages are given, pacstrap defaults to the "base" group.
Required X Window Systems packages for openbox will be installed in post-installation configuration
The system uses wireless network, so install the required wireless network packages.
# pacstrap /mnt base base-devel wireless_tools netcfg wpa_supplicant wpa_actiond
Generate an fstab file
The fstab file contains static filesystem information. It defines how storage devices and partitions are to be mounted and integrated into the overall system. It is read by the mount command to determine which options to use when mounting a specific device or partition.
Most likely swap partition will have wrong filesystem name, so this needs to be changed.
# genfstab -p /mnt >> /mnt/etc/fstab
# vi /mnt/etc/fstab
--------------------
...
/dev/mapper/lvm-swap   none   swap  defaults  0  0
Chroot into the system
# arch-chroot /mnt
Configuring the System
Let's configure the primary configuration files
/etc/rc.conf is the configuration file for Arch's initscripts. Some of options in this file has been obsolete and they now have own configuration files (ex: hostname, etc...). /etc/rc.conf still configures daemons to start during boot-up and some networking and storage information.
Editing /etc/rc.conf:
Since LVM is used on this system, I need to enable it so that the kernel knows about it
# vi /etc/rc.conf
--------------------
USELVM="yes"
Hostname:
Configuring hostname requires updating two files, /etc/hostname and /etc/hosts
Add hostname in /etc/hostname
# cat > /etc/hostsname
arch64
^D
Add hostname in /etc/hosts
# vi /etc/hosts
--------------------
127.0.0.1   localhost.localdomain localhost arch64
::1  localhost.localdomain localhost arch64
Console fonts and keymap:
The console, meaning a terminal running with no X Window System, uses the ASCII character set as the default.
A console font is limited to either 256 or 512 characters. The fonts are found in /usr/share/kbd/consolefonts/.
Keymaps, the connection between the key pressed and the character used by the computer, are found in the subdirectories of /usr/share/kbd/keymaps/
# cat > /etc/vconsole.conf
KEYMAP=us
FONT=
FONT_MAP=
^D
- KEYMAP - the default (us) is ok
- FONT - the default (blank) is ok
- FONT_MAP - the default (blank) is ok
Timezone:
Available time zones and subzones can be found in the /usr/share/zoneinfo/<Zone>/<SubZone> directories.
Create a symlink /etc/localtime to zone file
# ln -s /usr/share/zoneinfo/US/Eastern /etc/localtime
Locale:
Choose the locale(s) from /etc/locale.gen and uncomment them.
# vi /etc/locale.gen
--------------------
en_US.UTF-8 UTF-8
--------------------
# locale-gen
Setting up system-wide locale:
# cat > /etc/locale.conf
LANG=en_US.UTF-8
LC_TIME=en_US.UTF-8
^D
Set the LANG variable for the ramdisk creation
# export LANG=en_US.UTF-8
Hardware clock time:
It's recommended to use UTC.
# hwclock --systohc --utc
Configuring wireless network:
Copy wireless-wpa from /etc/network.d/examples/ to /etc/network.d and rename it something else. This will be a template for my profile. Open it and change ESSID to my SSID name. Delete everything below ESSID. The KEY value needs to be a hex string so it'll be generated by using the wpa_passphrase command:
# wpa_passphrase SSID_NAME "PASSPHRASE" >> /etc/network.d/[profile_name]
Open the profile and delete the lines starting with network={, ssid=, #psk=, and }, leaving only the psk line. Then change this psk to KEY, and add IP='dhcp' to the bottom of the line:
cat /etc/network.d/[profile_name]
--------------------
CONNECTION='wireless'
DESCRIPTION='WPA encrypted wireless connection'
INTERFACE='wlan0'
SECURITY='wpa'
ESSID=[SSID_name]
KEY=[hex_string_for_passphrase]
IP='dhcp'
Now, connect to the profile:
# netcfg [profile_name]
If no errors, it should display :: [profile_name] up
Configure the rc.conf file for auto connecting to the wireless network after each reboot:
vi /etc/rc.conf
--------------------
DAEMONS=(... net-auto-wireless ...)
Make sure /etc/conf.d/netcfg has the following values:
cat /etc/conf.d/netcfg
--------------------
NETWORKS=(last)
WIRELESS_INTERFACE="wlan0"
Create an initial ramdisk environment:
Configure /etc/mkinitcpio.conf for LVM by adding lvm2 in the HOOKS section before filesystems so that the kernel will find LVM volumes at boot time.
# vi /etc/mkinitcpio.conf
--------------------
HOOKS="...lvm2 filesystems..."
Now generate the kernel image.
# cd /boot
# mkinitcpio -p linux
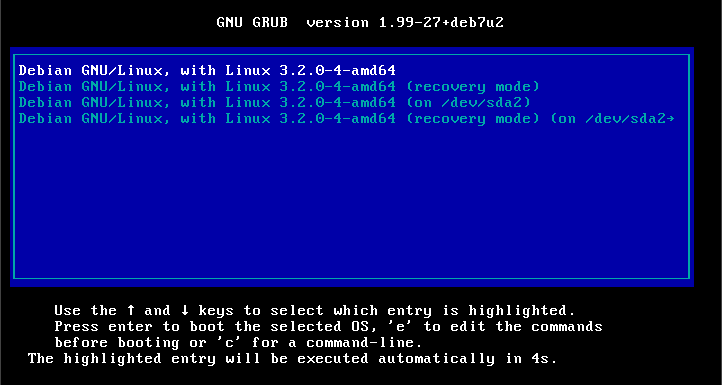
Install and configure a bootloader:
# pacman -S grub-bios
# grub-install --target=i386-pc --recheck /dev/sda
Create a grub configuration file.
# grub-mkconfig -o /boot/grub/grub.cfg
Root password:
Set the root password now
# passwd
Unmount the partitions and reboot:
Exit from the chroot environment.
# exit
Since the partitions are mounted under /mnt, unmount them.
# umount /mnt/{boot,home,}
Exit the install and reboot.
# reboot
Post-Installation
Updating the system:
Sync, refresh, and upgrade the entire new system.
# pacman -Syu (or pacman --sync --refresh --sysupgrade)
Pacman will now download a fresh copy of the master package list from the server(s) defined in /etc/pacman.conf and perform all available upgrades.
Pacman output is saved in /var/log/pacman.log
Adding a user:
Now add a normal user account for daily tasks
# useradd -m -g users -G audio,games,log,lp,optical,power,scanner,storage,video,wheel -s /bin/bash ubyt3m3
Set a password for ubyt3m3
# passwd ubyt3m3
X Window System:
The X Window System (commonly X11, or X) is a networking and display protocol which provides windowing on bitmap displays. It provides the standard toolkit and protocol to build graphical user interfaces (GUIs).
Now install the base Xorg packages using pacman.
# pacman -S xorg-server xorg-xinit xorg-server-utils
Install video driver:
My system came with ATI Graphics Card, so install the open source raden driver.
# pacman -S xf86-video-ati
Install input driver:
Since this install is for notebook, following package is needed for touchpad.
# pacman -S xf86-input-synaptics
Testing X:
Install the default environment.
# pacman -S xorg-twm xorg-xclock xterm
Fonts
Install a set of TrueType fonts, as only unscalable bitmap fonts are included by default. DejaVu is a set of high quality.
# pacman -S ttf-dejavu
That's the very base system. Installation and configuration of other software will be in another time.
That's all!
-gibb