Tagged: how_to

Debian Wheezy (7.5): Accessing the Encrypted Partition From the Recovery System

Continued from my previous post, Debian Wheezy (7.5): Encrypted Root Filesystem on laptop.

In my previous post, I created an extra partition for recovery system that could be used to repair the main system in a situation where it becomes corrupted or un-bootable. But how exactly can I access it from the recovery system? Well, steps described below is something I would try, in other words, just a theory. If you know a better (correct) way, or if I'm doing wrong, please feel free to comment!

Disclaimer:
The information in this site is the result of my researches in the Internet and of my experiences. It is solely used for my purpose and may not be suitable for others. I will NOT take any responsibility of end result after following these steps (although I will try to help if you send me your questions/problems).

Booting Into the Recovery System

At the GRUB menu, choose the Recovery system. In my case it's on /dev/sda2.
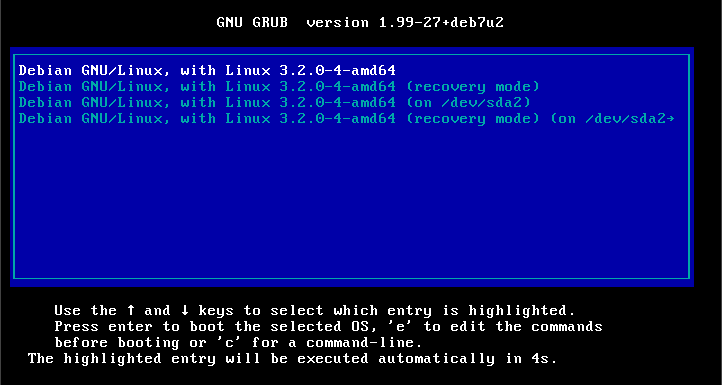
debian_install_4

Accessing Encrypted Device with `cryptsetup luksOpen`

First, let's see my partition layout: # parted (parted) p Model: ATA WDC WD3200BEKT-6 (scsi) Disk /dev/sda: 320GB Sector Size (logical/physical): 512B/512B Partition Table: gpt Number Start End Size File system Name Flags 1 1049kB 310GB 310GB 2 310GB 320GB 10.1GB ext4 (parted) q

Since /dev/sda1 is encrypted with crypt-luks, normal mount command would not work. # mount /dev/sda1 /mnt/main mount: unknown filesystem type 'crypto_LUKS'

So it needs to be opened to access the encrypted device. This process requires your passphrase. This will create /dev/mapper/unlocked. # cryptsetup luksOpen /dev/sda1 unlocked Enter passphrase for /dev/sda1:

Can we mount the device now? Nope. Because it's LVM.

Accessing LVM

First install lvm2. # apt-get install lvm2

SIDE NOTE:
If you get the following warnings after executing above command:

update-initramfs: Generating /boot/initrd.img-3.2.0-4-amd64
W: Possible missing firmware /lib/firmware/rtl_nic/rtl8168f-2.fw for module r8169
W: Possible missing firmware /lib/firmware/rtl_nic/rtl8168f-1.fw for module r8169
W: Possible missing firmware /lib/firmware/rtl_nic/rtl8105e-1.fw for module r8169
W: Possible missing firmware /lib/firmware/rtl_nic/rtl8168e-3.fw for module r8169
W: Possible missing firmware /lib/firmware/rtl_nic/rtl8168e-2.fw for module r8169
W: Possible missing firmware /lib/firmware/rtl_nic/rtl8168e-1.fw for module r8169
W: Possible missing firmware /lib/firmware/rtl_nic/rtl8168d-2.fw for module r8169
W: Possible missing firmware /lib/firmware/rtl_nic/rtl8168d-1.fw for module r8169

You need to add contrib and non-free repositories to /etc/apt/sources.list: # vim /etc/apt/sources.list -------------------------------------- deb http://ftp.us.debian.org/debian wheezy main contrib non-free # apt-get update Then install the firmware-realtek package: # apt-get install firmware-realtek

Then load the necessary module. # modprobe dm-mod

Scan the system for LVM volumes and identify the volume group name in the output. # vgscan Reading all physical volumes. This may take a while... Found volume group "debian" using metadata type lvm2

Activate the volume. # vgchange -ay debian 2 logical volume(s) in volume group "debian" now active

Then find the logical volume that has the root filesystem # lvs LV VG Attr LSize Pool Origin Data% Move Log Copy% Convert root debian -wi-a--- 284.98g swap debian -wi-a--- 3.72g

Mounting It Now!

Now all the preparation is done. It's time to mount it. # mount -o ro,user /dev/debian/root /mnt/unlocked # ls mnt/unlocked bin etc lib media proc sbin sys var boot home lib64 mnt root selinux tmp vmlinuz dev initrd.img lost+found opt run srv usr

VoilĂ ! Successfully mounted!

That's all!
-gibb

Debian Wheezy (7.5): Encrypted Root Filesystem on laptop

I'm not a distro-hopper. Well, that's what I thought but I'm probably wrong (and nothing wrong with being a distro-hopper!). On my main system, I'm using Slackware since its version 9 or 10. However, on my laptop (HP Pavilion dm3-1130us), I tried RHCE, Fedora, Xubuntu, Mint, CrunchBang, Arch, and FreeBSD. Each distro had its pros and cons but it didn't really stick to me. I liked FreeBSD the best among them but it drained the battery and heated up my laptop compared to other distros. Also I couldn't get some of hardware components (ex: built-in webcam) working. I believe FreeBSD is an excellent OS for servers but probably not for laptops so much. So, I was in a quest for another distro again and decided to try on Debian.

Disclaimer: The information in this site is the result of my researches in the Internet and of my experiences. It is solely used for my purpose and may not be suitable for others. I will NOT take any responsibility of end result after following these steps (although I will try to help if you send me your questions/problems).

Now onto Debian. As other distributions, I wanted to try encrypted disk/filesystem(s) for my laptop. After a bit of research, I came across to this article. Interesting. My laptop doesn't have a CD/DVD drive, either, but I never thought of having a recovery partition in case of emergency. So I decided to give it a try with this method. Since this article is a bit outdated, I'll describe it with most recent version of Debian (Wheezy) and add some steps.

1. Creating Bootable USB Stick

Download the netinst.iso image from Debian website and create a bootable USB stick. # dd if=debian-7.5-0-amd64-netinst.iso of=/dev/sdX

2. Setting Up Recovery System

Start the Debian installer. Since I love OpenBox, I select below options for the installation.
Advanced options -> Alternative desktop environments -> LXDE -> Graphical install
Follow the installer until you get to set the hostname. I set it as debianrecov for recovery. Follow it until you get to "Partition disks" and select Manual. Here is the partition scheme to use:
  • Main partition for LVM and encrypted, taking up the whole disk minus 3GB. Set it as Do not use for now.
  • 3GB recovery partition at the end of the disk. This will be /boot for the main system. (3GB is an arbitrary size I picked. I tried with 1GB and the installation failed when installing packages.)
    - Set it as ext4 mounted as "/" - Set its label as "recovery"
Choose Finish partitioning and write changes to disk. It'll then warn you that there is no partition for swap space and ask you whether to return to the partition menu. Just select No and follow the rest of the installation. Reboot your system and make sure it boots up without any issues.

3. Setting Up Main System

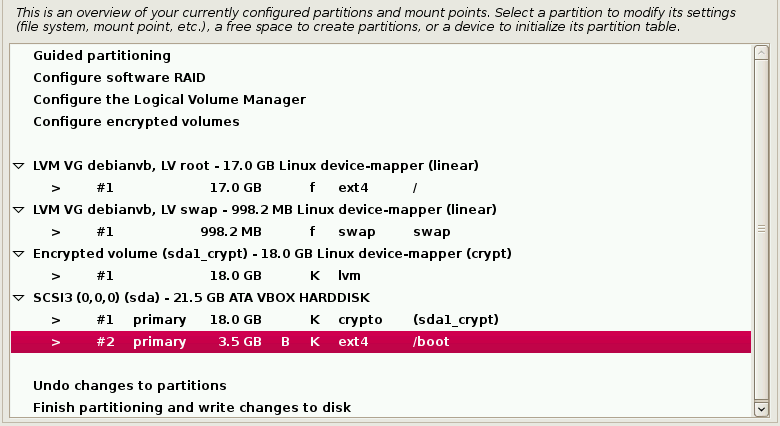
Now boot the Debian installer again. Select the same options for the installation and follow it until you get to "Partition disks". Select Manual. Select the main partition and hit the Continue button. Then choose physical volume for encryption for "Use as:". debian_install_1 Select "Done setting up the partition". Next select "Configure encrypted volumes". Then "Create encrypted volumes" and choose the main partition. After selecting "Yes" for erasing data on the partition, it'll start randomizing it. This will take very long time (on my laptop, it took more than 10 hours). When it's done, it'll ask for a passphrase. This is the phrase you type at every boot and it is not recoverable so don't forget it! Select the contents of the "disk" Encrypted volume and debian_install_2 Next, select physical volume for LVM for "Use as:" and choose "Done setting up the partition". Then select Configure the Logical Volume Manager and create a Volume Group. The original article uses the hostname for the Volume Group to reduce confusion if the disk is plugged into another machine for disaster recovery. I think that's a great idea. Create a Logical Volume called swap. If you plan to use suspend-to-disk, this needs to be at least as large as your RAM. Create a Logical Volume called root. Set the swap Logical Volume you just created to be used as a swap area and your root Logical Volume to be used as ext4 mounted at "/". Also set your recovery partition to be used as ext4, mounted on "/boot", and the format partition option to "no, keep existing data". This is how the partition layout looks like: debian_install_3 Proceed with the rest of the installation and reboot the system when it's done.

4. Making Them Dual-boot

In the original article, it now talks about setting up dual-boot. Debian Wheezy uses GRUB2 and menu.lst is no longer available. However, it should automatically detect your recovery system and it should look like below during GRUB menu: debian_install_4 If your recovery system is missing, you could try running the update-grub2 command in your main system: # update-grub2 Generating grub.cfg ... Found linux image: /boot/vmlinuz-3.2.0-4-amd64 Found initrd image: /boot/initrd.img-3.2.0-4-amd64 Found Debian GNU/Linux (7.5) on /dev/sda2 done If update-grub2 did not work, make sure that the recovery partition was set to be ext4, mounted on "/boot", and the format partition option was set to "no, keep existing data" at the end of Step 3 above. Tomorrow, I'll talk about accessing main system's area from recovery system. That's all! -gibb

FreeBSD 10: Installing Apache 2.4, MySQL 5.5, and PHP5.5 — Missing libphp5.so

Continuing my quest with FreeBSD.

Today, I was installing Apache 2.4, MySQL 5.5, and PHP 5.5 (php55-5.5.11) on newly installed system. I've done this kind of installation many times on Linux so I didn't expect much of problems. Boy, I was wrong...

Apache and MySQL installation were straight forward and had no problem. After PHP installation, I couldn't find libphp5.so in /usr/local/libexec/apache24/! A little googling found articles/forums on older version of FAMP. They said its installation should be automatic or "Build Apache module" option needs to be selected, which I did not have such an option any where.

Then one thread mentioned something about configuring php conf file. So, I opened Makefile for PHP55: # vim Makefile ------------------------------------- ... OPTIONS_DEFINE+=APACHE CLI CGI FPM... OPTIONS_DEFAULT=APACHE CLI CGI FPM...

Compiled PHP55 again: # make install config ===> php55-5.5.11 doesn't install the Apache module anymore: update your OPTIONS and build www/mod_php55 port instead. *** Error code 1

Aha! www/mod_php55. I wonder if php installation didn't install mod_php55 but now I know what I need to do: # cd /usr/local/www/mod_php55/ # make install clean ... --- Zend/zend_dtrace_gen.h dtrace: failed to compile script /usr/ports/www/mod_php55/work/php-5.5.11/Zend/zend_dtrace.d: line 30: failed to resolve INP_IPV4: Unknown variable name ...

Hmm... I wonder if this was causing php55 installation to fail creating libphp5.so. Well, another googling found a suggestion/solution to load the dtraceall module: # kldload dtraceall # echo 'dtraceall_load="YES"' >> /boot/loader.conf

Now, mod_php55 was successfully installed as well as libphp5.so!

Here is the whole steps to install apache, mysql, and php:

NOTE: The steps below are not suitable for production use. Be warned!

Disclaimer:
The information in this site is the result of my researches in the Internet and of my experiences. It is solely used for my purpose and may not be suitable for others. I will NOT take any responsibility of end result after following these steps (although I will try to help if you send me your questions/problems).

Apache 2.4 - Installation and Configuration:

# cd /usr/ports/www/apache24/ # make install clean

Edit /etc/rc.conf to make the Apache server will start automatically at system boot. # vim /etc/rc.conf ------------------------------------- apache24_enable="YES"

Test the Apache server installation using the following command: # /usr/local/etc/rc.d/apache24 start

MySQL - Installation and Configuration:

# cd /usr/ports/databases/mysql55-server/ # make install clean

Start MySQL # /usr/local/etc/rc.d/mysql-server onestart

Update /etc/rc.conf # vim /etc/rc.conf ------------------------------------- mysql_enable="YES"

Set root password # rehash # mysqladmin -uroot password '<password>'

Create my.cnf # cp /usr/local/share/mysql/my-small.cnf /etc/my.cnf

Restart mysql # /usr/local/etc/rc.d/mysql-server restart

PHP Installation and Configuration:

Here is the moment of truth. First, load the dtraceall kernel module, update the /boot/loader.conf file, and then install php55. # kldload dtraceall # echo 'dtraceall_load="YES"' >> /boot/loader.conf # cd /usr/ports/lang/php55 # make install clean

Check to see if libphp5.so is there # ls /usr/local/libexec/apache24/ httpd.exp mod_include.so mod_access_compat.so mod_info.so ...

Nope, it's not there. Then manually compile www/mod_php55/ # cd /usr/ports/www/mod_php55/ # make install clean

Now, check to see if libphp5.so is there again # ls /usr/local/libexec/apache24/ httpd.exp mod_include.so libphp5.so mod_info.so ...

Copy the PHP configuration file # cp /usr/local/etc/php.ini-production /usr/local/etc/php.ini

Edit /usr/local/etc/apache24/httpd.conf file and add the following lines # vim /usr/local/etc/apache24/httpd.conf ------------------------------------- AddType application/x-httpd-php .php AddType application/x-httpd-php-source .phps

Add the following line under the LoadModule section if it's not there LoadModule php5_module libexec/apache24/libphp5.so

Edit the DirectoryIndex section DirectoryIndex index.php index.html

Now restart the apache server # /usr/local/etc/rc.d/apache24 restart

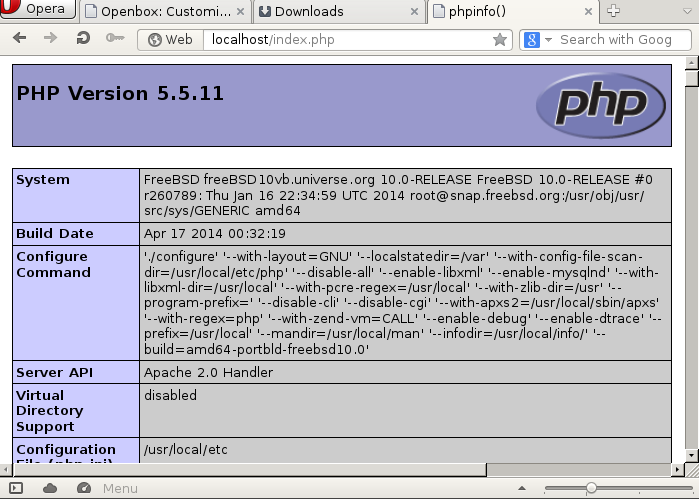
Let's see now if it can show a php page # vim /usr/local/www/apache24/data/index.php ------------------------------------- < ?php phpinfo(); ?>

VoilĂ ! It's working now!

phpinfo

That's all!
-gibb

FreeBSD: Installing VirtualBox — No rule to make target ‘/sys/kern/bus_if.m’ Compile Error

One of the reasons I need VirtualBox on my HP Pavilion laptop is that I need Windows system to access to my work environment. The program only runs on Windows or Mac. I suggested (or rather complained) to make it available for Linux users but to this day my wish hasn't granted.

So let's install VirtualBox from the ports.

Disclaimer:
The information in this site is the result of my researches in the Internet and of my experiences. It is solely used for my purpose and may not be suitable for others. I will NOT take any responsibility of end result after following these steps (although I will try to help if you send me your questions/problems).

As always, check for updates on ports: # ports fetch # portsnap update

Now follow the instruction in the handbook, 21.3. FreeBSD as a Host. # cd /usr/ports/emulators/virtualbox-ose/ # make install clean ... kmk[2]: *** No rule to make target `/sys/kern/bus_if.m', needed by `/usr/ports/emulators/virtualbox-ose/work/VirtualBox-4.3.10_OSE/out/freebsd.amd64/release/obj/FreeBSDGeneratedKernelHeaders/bus_if.h'. Stop. kmk[2]: Leaving directory `/usr/ports/emulators/virtualbox-ose/work/VirtualBox-4.3.10_OSE' kmk[1]: *** [pass_installs_this] Error 2 kmk[1]: Leaving directory `/usr/ports/emulators/virtualbox-ose/work/VirtualBox-4.3.10_OSE' kmk: *** [pass_installs_order] Error 2 *** Error code 2 Stop in /usr/ports/emulators/virtualbox-ose. *** Error code 1 Stop in /usr/ports/emulators/virtualbox-ose.

Huh? Error? Let's see what went wrong.

kmk[2]: *** No rule to make target `/sys/kern/bus_if.m', needed by...

This line seems to be the root cause. It looks like /sys/kern/bus_if.m is missing? Indeed, there is nothing under /sys. Furthermore, /sys is a link to /usr/src/sys which means I'm missing kernel source files? I then downloaded src.txz from the FreeBSD site. # tar -C / -xvf src.txz

Then compile virtualbox again. This time it went through without any errors! Yahoo!

Now follow the rest of the steps in the handbook. Load the kernel module and update /boot/loader.conf to ensure the module gets loaded at each reboot: # kldload vboxdrv # vi /boot/loader.conf ------------------------------------ vboxdrv_load="YES"

For bridged or host-only networking, add the following to /etc/rc.conf and reboot the computer: # vi /etc/rc.conf ------------------------------------ vboxnet_enable="YES"

To use VirtualBox, all users need to be the member of vboxusers: # pw groupmod vboxusers -m <username>

The default permissions for /dev/vboxnetctl are restrictive and need to be changed for bridged networking: # chown root:vboxusers /dev/vboxnetctl # chmod 0660 /dev/vboxnetctl

Update /etc/devfs.conf to make above change permanent: # vi /etc/devfs.conf ------------------------------------ own vboxnetctl root:vboxusers perm vboxnetctl 0660

Finally, type VirtualBox in a terminal to launch it: $ VirtualBox &

That's all!
-gibb

FreeBSD 10 with Full Disk Encryption on UFS Filesystem

Since its release on 1/20/2014, I have been trying to install FreeBSD 10 on my HP Pavilion dm3-1130us notebook with ZFS because I wanted to utilize its full disk encryption; however, every time I try, it failed during the boot process with the following messages: gptzfsboot: error 66 lba 48 gptzfsboot: error 66 lba 1 gptzfsboot: No ZFS pools located, can't boot

I googled but couldn't find any solutions even now. If anyone knows how to resolve this, I'm all ears.

Disclaimer:
The information in this site is the result of my researches in the Internet and of my experiences. It is solely used for my purpose and may not be suitable for others. I will NOT take any responsibility of end result after following these steps (although I will try to help if you send me your questions/problems).

So for now, I'm going to install it with full disk encryption on UFS instead. After many trial and errors, I found steps that worked on my system (thanks to BSD Now). I'll just list commands below just in case the site becomes unavailable in the future (it happens!).

Installation:

Follow the installation until the partition menu. Choose shell to manually configure the disk encryption before the OS is installed.

To view a list of disk devices, run: # sysctl kern.disks

With a blank disk, run: # gpart create -s gpt ada0

Or destroy existing one: # gpart destroy -F ada0

Create 3 partitions. The first is for the boot record, the second is an unencrypted /boot partition (from which the kernel is loaded) and the third is the large encrypted partition for the rest of the OS and files. # gpart add -t freebsd-boot -s 512k -a 4k ada0 # gpart add -t freebsd-ufs -l bootfs -s 1g -a 1m ada0 # gpart add -t freebsd-ufs -l encrypted -a 1m ada0

Install the bootcode: # gpart bootcode -b /boot/pmbr -p /boot/gptboot -i 1 ada0

Encrypt the partition: # geli init -b -s 4096 ada0p3 Enter passphrase: Reenter passphrase:

Attach the device: # geli attach ada0p3 Enter passphrase: cryptosoft0: on motherboard GEOM_ELI: Device ada0p3.eli created GEOM_ELI: Encryption: AES-XTS 128 GEOM_ELI: Crypto: software

Format the partitions: # newfs -U /dev/ada0p2 # newfs -U /dev/ada0p3.eli

Mount the partitions: # mount /dev/ada0p3.eli /mnt # mkdir /mnt/unenc # mount /dev/ada0p2 /mnt/unenc # mkdir /mnt/unenc/boot # ln -s unenc/boot /mnt/boot

Create the fstab file: # vi /tmp/bsdinstall_etc/fstab ---------------------------------------------------- # Device Mountpoint FStype Options Dump Pass# /dev/ada0p2 /unenc ufs rw,noatime 1 1 /dev/ada0p3.eli / ufs rw,noatime 2 2

Automatically load the kernel modules that are required for booting from an encrypted volume: # vi /tmp/bsdinstall_boot/loader.conf ---------------------------------------------------- geom_eli_load="YES" vfs.root.mountfrom="ufs:ada0p3.eli"

Exit out and follow the rest of installation. After rebooting, it should prompt for passphrase.

However, on my system there was a bit of gotcha after the reboot: FreeBSD10_encryption

As you might see in above image, some kernel messages followed right after the passphrase prompt. I did not realize this for a while and made me think that the encryption failed (and it took me a while to figure out...). To confirm the encryption is working, press Enter. The passphrase prompt shows up again: GEOM_ELI: Wrong key for ada0p3. Tries left: 2. Enter passphrase for ada0p3:

That's all!
-gibb