Tagged: Openbox

Debian Wheezy (7.5): Changing Default X Session

I mainly use Openbox. But after Debian Wheezy installation, X Window System defaulted to LXDE. It's not that much of a hassle to select Openbox from the drop-down menu every time I log on:

Debian_LoginBox

However, sometimes I forget to select Openbox, get LXDE, and re-log in with Openbox. This happened quite a few times and I finally decided to change its default X session to Openbox.

Disclaimer:
The information in this site is the result of my researches in the Internet and of my experiences. It is solely used for my purpose and may not be suitable for others. I will NOT take any responsibilities of end result after following these steps (although I will try to help if you send me your questions/problems).

There are quite a few ways to do this. One way is to edit (or create if it doesn't exist) ~/.xsession or ~/.Xsession.

But I used the update-alternatives command: $ update-alternatives --config x-session-manager

Debian_update-alternatives

As shown in above image, select number 2 for Openbox. After logging out, Openbox becomes the default X Window Session!

That's all!
-gibb

FreeBSD 10 RC2, Installation and Configuration for OpenBox

On the other day, I ran below command to update the Arch Linux system on my notebook: # pacman -Syu

It seemed something went wrong and the system became non-responsive. After hard boot, it did not boot up anymore. I believe this was second time it happened to me. IMHO, Arch Linux is a good, solid operating system but I was a bit uncomfortable with its rolling release system. I'm more of "why fix if it's not broken?" type of a guy so I decided to change to another distribution.

I tried CrunchBang(#!) Linux and Debian but was not impressed much. Then I found FreeBSD. FreeBSD and I have a bit of history. It was my first UNIX-like system that I installed on my old Dell Dimension XPS system back in late 1990s. I remember that I drove to a book store in neighboring state just to buy a FreeBSD Handbook (ah~ those old good days...). Since then, I was on and off with FreeBSD.

Disclaimer:
The information below is the result of my researches in the Internet and of my experiences. It is solely used for my purpose and may not be suitable for others.

Installation:

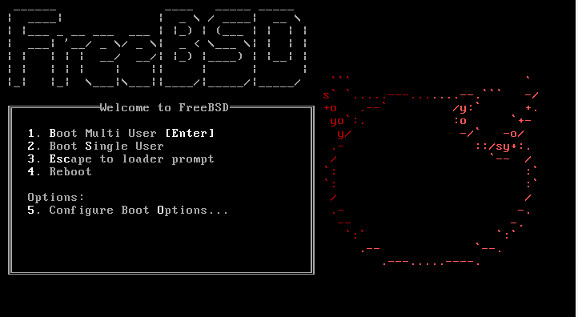
Now let's get going. It welcomes you with text based installation screen with FreeBSD logo. FreeBSD_install_welcome

FreeBSD is moving to use 'bsdinstall' as default installer instead of 'sysinstall'. The installation is fairly simple and quick. Following is the components you can configure during installation:

  • Keymap Selection
  • Set Hostname
  • Distribution Select
  • Partitioning
  • Root Password
  • Network Configuration
  • Select local or UTC clock
  • Timezone Select
  • System Configuration
  • Add User Account
  • Final Configuration

After rebooting, a bare-bone installation of FreeBSD 10 is ready to go. As I said it is a "bare-bone" system. Most of software needs to be manually installed; this includes Xorg.

Portsnap: a Ports Collection Update Tool

Before installing Xorg, let's update the ports collection on the system: # portsnap fetch Looking up portsnap.FreeBSD.org mirrors... 9 mirrors found. Fetching snapshot tag from geodns-1.portsnap.freebsd.org... done. Fetching snapshot metadata... done. ... # portsnap extract /usr/ports/.cvsignore /usr/ports/CHANGES /usr/ports/COPYRIGHT ...

portsnap fetch downloads most up-to-date ports collection when executed for the first time. Thereafter, it only finds and updates as needed.

portsnap extract installs downloaded files. extract should be executed when portsnap is run first time. Anytime after, update should be used.

Xorg Installation

xorg can be installed as follows. During its installation, it'll ask a couple of questions/choices. I just take defaults: # cd /usr/ports/x11/xorg # make install clean

USB Mouse Configuration for X

On my HP Pavilion notebook, following settings /etc/rc.conf are needed for USB mouse or touchpad to work: # vi /etc/rc.conf ----------------------------------------- dbus_enable="YES" hald_enable="YES" moused_type="auto" moused_enable="NO"

[Edit 2/12/2014] Above settings in /etc/rc.conf is good enough for USB mouse but not for touchpad or synaptic device. To make it work, following setting worked for me. Add the following line in /boot/loader.conf: # vi /boot/loader.conf ----------------------------------------- hw.psm.synaptics_support="1"

OpenBox Installation

Install openbox and other software from the ports collection: # cd /usr/ports/x11-wm/openbox # make install clean

obconf helps installing new themes: # cd /usr/ports/x11-wm/obconf # make install clean

obmenu is a menu editor designed for openbox. I don't particularly use it but I install it just in case when I need to use it: # cd /usr/ports/x11-wm/obmenu # make install clean

lxappearance is a GUI GTK theme switcher, GTK deals with the contents of a window, icons, background window color (but not the title bar - use obconf for that): # cd /usr/ports/x11-themes/lxappearance # make install clean

Tint2 is highly customizable, lightweight panels and taskbars: # cd /usr/ports/x11/tint # make install clean

conky is a free, light-weight system monitor for X, that displays any information on your desktop. Conky is licensed under the GPL and runs on Linux and BSD: # cd /usr/ports/sysutils/conky # make install clean

nitrogen is a fast and lightweight desktop background browser and setter for X windows: # cd /usr/ports/sysutils/nitrogen # make install clean

Sudo (su "do") allows a system administrator to delegate authority to give certain users (or groups of users) the ability to run some (or all) commands as root or another user while providing an audit trail of the commands and their arguments.: # cd /usr/ports/security/sudo # make install clean

rxvt-unicode is a terminal emulator: # cd /usr/ports/x11/rxvt-unicode # make install clean

Edit .xinitrc to start openbox-session: $ cat > ~/.xinitrc exec openbox-session ^D

Now follow my another post, Openbox: Customizing to My Liking

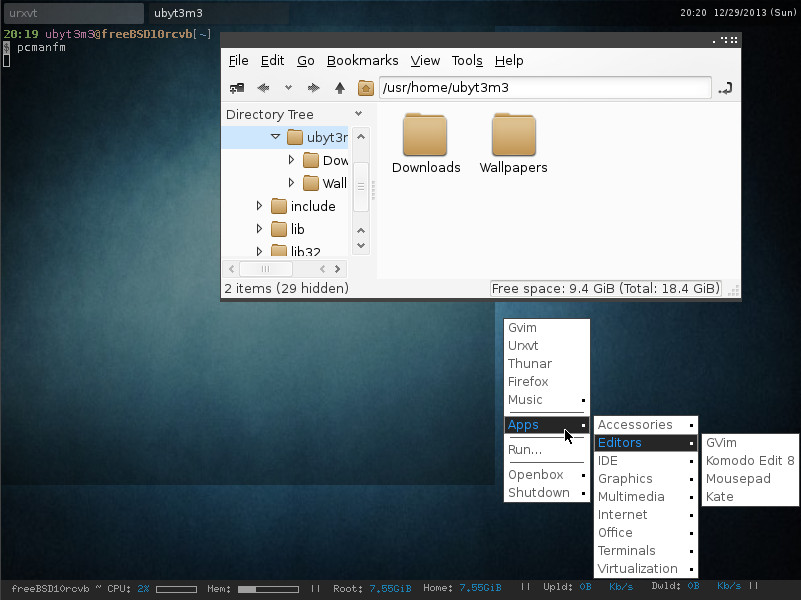
Voilà! Here is a screenshot of my new system: FreeBSD_OpenBox

That's all!
-gibb

Slackware64: Installing Openbox on Slackware64 14.1

Continued from my previous post, Slackware64: Installing Slackware 14.1, I'm going to install Openbox as my default window manager. And this is how it looks in vm client

slacky64

Disclaimer:
The information below is the result of my researches in the Internet and of my experiences. It is solely used for my purpose and may not be suitable for others.

To install Openbox and other packages, visit SlackBuilds.org. Slackbuilds.org offers the collection of slackbuild scripts. A slackbuild script is just a shell script which contains none of the code from the application it is going to install. Its only purpose is to help you build a Slackware package, which you can then install using 'installpkg' or 'upgradepkg'.

Now let's get going...

Installation of Openbox:

First, download the source and slackbuild for openbox: $ cd Downloads/ $ tar -xzvf openbox.tar.gz ... $ mv openbox-3.5.0.tar.gz openbox/; cd openbox $ su # ./openbox.SlackBuild ... # installpkg /tmp/openbox-3.5.0-x86_64-1_SBo.tgz ... Executing install script for openbox-3.5.0-x86_64-1_SBo.tgz Package openbox-3.5.0-x86_64-1_SBo.tgz installed. #

Now, exit X, run 'xwmconfig' and choose xinitrc.openbox-session. Then start X again. I use openbox-session because this executes the 'autoscript' script when Openbox starts. 'autoscript' contains programs that are executed at start-up. At any rate, this time, your X Window is running Openbox. $ startx

slacky64_openbox

Don't be surprised if you see only blank screen. By default, openbox does not offer desktop icons, task bar, etc. But this means its customizable as you like.

obconf:

ObConf is a GTK+ tool to assist with the configuration of the Openbox window manager (from slackbuilds.org).

lxappearance:

LXAppearance is the standard theme switcher of LXDE. Users are able to change the theme, icons, and fonts used by applications easily (from slackbuilds.org).

tint2:

tint2 is a simple panel/taskbar intentionally made for openbox3, but should also work with other window managers.

The goal is to keep a clean and un-intrusive look with lightweight code and compliance with freedesktop specifications (from slackbuilds.org).

Requirement: imlib2

conky:

Conky is a system monitor for X originally based on the torsmo code. Since it's original conception, Conky has changed a fair bit from it's predecessor. Conky can display just about anything, either on your root desktop or in it's own window. Conky has many built-in objects, as well as the ability to execute programs and scripts, then display the output from stdout (from slackbuilds.org).

nitrogen:

Nitrogen is a background browser and setter for X windows (from slackbuilds.org).

Requirement: gtkmm, mm-common, atkmm, pangomm, cairomm, glibmm, libsigc++

rxvt-unicode:

rxvt-unicode is an enhanced version of the rxvt terminal emulator. It has full unicode and Xft support, does font antialiasing and italics, and has the same transparency capabilities as ATerm. It can be extended using Perl. (from slackbuilds.org).

Now follow my previous post, Openbox: Customizing to My Liking

That's all!
-gibb

Openbox: Customizing to My Liking

In another post, I mentioned that I love Openbox for its minimal overhead, few dependencies, customizable menu and key-binding, and speed. I use it on my home system and decided to use the same configuration on my new notebook. Here is how I currently configured my system(s).

Disclaimer: The information below is the result of my researches in the Internet and of my experiences. It is solely used for my purpose and may not be suitable for others.

ObConf:

ObConf is the Openbox configuration tool which easily change themes of menus and windows. I happen to like 1977 Openbox theme available from Box-Look.org or here. $ mv 1977-Grey.obt /tmp $ obconf & ------------------------ Theme -> Install a new theme... -> 1977-Grey Appearance -> Button Order: IMC Appearance -> Active Window Title: Sans 4

Theme:

I use Morning Glory (GTK 2.x theme) available from Gnome-Look.org and customized it for my liking. My customized one is available here. Once downloaded it, un-tar it and move it to the .theme directory. Use lxappearance to select it as the theme. $ tar -xzvf MorningGlory.tar.gz $ mv MorningGlory ~/.themes $ lxappearance & ------------------------ Widget -> MorningGlory

Panel:

I use tint2 for my panel. My titn2rc is available here. $ tar -xzvf tint2.tar.gz $ mkdir ~/.config/tint2 $ mv tint2rc ~/.config/tint2/ $ tint2 & (or put it in autostart.sh)

Conky:

Conky is a fee software system monitor for X11 and is able to monitor system resources like CPU, memory, processes, disk usage, network interfaces, and much more. My conky is very simple and it displays system resources at the bottom of screen, looks much like a panel. My conkyrc file is available here. $ tar -xzvf conkyrc.tar.gz $ mv .conkyrc ~/ $ conky & (or put it in autostart.sh)

Autoscript:

When Openbox is launched with the openbox-session command, the environment script will be executed to set up the environment, and then the autostart script can launch any applications you want to run at startup, such as a panel, setting up a desktop wallpaper, etc... Once Openbox starts, the system-wide default script, located at /etc/xdg/openbox/autostart, will be run. Then the user script at ~/.config/openbox/autostart is run afterward. This is my autostart.

File managers:

I use Thunar; a fast, light-weight and easy-to-use file manager. It is the file manager for Xfce. I started using sunflower. It is available in AUR, so it needs to be built: $ mkdir ~/builds $ mv sunflower.tar.gz ~/builds $ tar -xzvf sunflower.tar.gz $ cd sunflower ------------------------ Check for PKGBUILD and any install files ------------------------ $ makepkg -s # pacman -U sunflower-<version number>-<package revision number>-<architecture>.pkg.tar.xz $ pacman -Qm

Icons:

Icons theme that I use is Faenza 1.2 available from Gnome-look.org. It comes with "zipped" format so I need an unzip program to extract it. $ mkdir icons; mv faenza_icons_by_tiheum-d2v6x24.zip icons/; cd icons $ unzip faenza_icons_by_tiheum-d2v6x24.zip $ ./INSTALL There is an INSTALL script for this so execute it and follow the instruction.

Wallpaper:

On my home system, I use nigrogen to draw wallpapers on my dual-head display, but I like feh for its lightweight and powerful image displaying capabilities. This is how to use it as a desktop wallpaper manager. $ feh --bg-scale /path/to/image.file As an image viewer: $ feh /path/to/image.file To browse images in a specific directory: $ feh -g 320x240 -d -S filename /path/to/directory
  • -g : Forces the images to appear no larger than 320x240
  • -d : Draws the file name
  • -S filename : Sorts teh images by file name
My current wallpaper for Arch Linux is available here.

Terminal:

I use rxvt-unicode (urxvt). It a terminal emurator forked from rxvt and supports unicode. It is highly customizable via ~/.Xdefaults and its complete reference is available from here. My .Xdefaults file is available here.

PS1:

My PS1 is very simple. Since there is only me on this system, I don't need to show the user name. Here is my .bashrc script $ vi ~/.bashrc ------------------------ ID=`id -u` if [[ "${ID}" -eq 0 ]]; then PS1='\]\e[01;35m\]root\]\e[00;31m\]@\h\[\e[00;37m\][\[\e[01;34m\]\w\[\e[00;37m\]]\n\[\e[47m\]\[\e[1;30m\]#\[\033[00m\] ' else PS1='\[\e[00;32m\]\A \[\e[00;91m\]\u\[\e[01;93m\]@\h\[\e[00;37m\][\[\e[01;34m\]\w\[\e[00;37m\]]\n\[\e[47m\]\[\e[1;30m\]$\[\e[00m\] ' fi set -o vi $ vim ~/.bash_profile ------------------------ if [ -f ~/.bashrc ]; then . ~/.bashrc fi

Key Binding:

One of Openbox’s great strengths is that every aspect of the window manager can be configured with keyboard. I'm still experimenting with this feature but here is my rc.xml. At this point, I move the active window with "Super" + l (to left), "Super" + h (to right), "Super" + k (to up), and "Super" + j (to down).

Menu:

My customized menu is here. This menu includes reboot and shutdown. For a regular user to be able run those commands, it needs to be added in the sudoers file:# visudo ------------------------ [user_name] ALL=NOPASSWD: /sbin/shutdown That's all!
-gibb

Openbox (w/ Arch Linux)

On my home system, I use Openbox as a stand-alone WM and I love it! It's lightweight and highly configurable. So, I decide to go with Openbox on my new notebook.

Disclaimer:
Information below is gathered mostly from the Arch Linux Wiki page and changed here and there for my liking. This information below is solely used for my purpose and may not be suitable for others.

Installation:

Install openbox package. # pacman -S openbox

Openbox configuration files:

There are four openbox configuration files and they need to be copied to ~/.config/openbox.

Execute below as a regular user, NOT as root. $ mkdir -p ~/.config/openbox $ cp /etc/xdg/openbox/{rc.xml,menu.xml,autostart,environment} ~/.config/openbox

  • rc.xml - Main configuration file. It defines keyboard shortcuts, themes, virtual desktops, etc...
  • menu.xml - It defines the content of the right-click menu.
  • autostart - This file is read by openbox-session at startup. It contains the programs that are run at startup. It is typically used to set environment variables, launch panels/docks, set background image or execute other startup scripts.
  • environment - This file is sourced by openbox-session at startup. It contains environment variables to be set in Openbox's context. Any variables you set here will be visible to Openbox itself and anything you start from its menus.

Executing Openbox as a stand-alone WM

I like its simplicity. So, I run it as a stand-alone WM.

Append the following to ~/.xinitrc $ cat >> ~/.xinitrc exec openbox-session ^D

This is how to start Openbox from the command shell. $ xinit /usr/bin/openbox-session

That's all!
-gibb