Tagged: Linux

Slackware64: Installing Slackware 14.1

Long waited new version of Slackware 14.1 was released a few days ago (11/07/2013). I also read a report from Alien Bob about this new version and it looks promising as ever!

Here is a screen shot of my slackware64 14.1 in vm client

slacky64

Disclaimer:
The information below is the result of my researches in the Internet and of my experiences. It is solely used for my purpose and may not be suitable for others.

Installing Slackware64 14.1

The installation of this version of Slackware is pretty much the same as previous ones. If you have ever installed Slackware before, there is no surprise. Slackware uses a non-graphical installer. If this is your first try, you may feel a bit overwhelmed but it is really easy to understand.

The most tricky part may be creating partitions with 'fdisk' or 'cfdisk'.
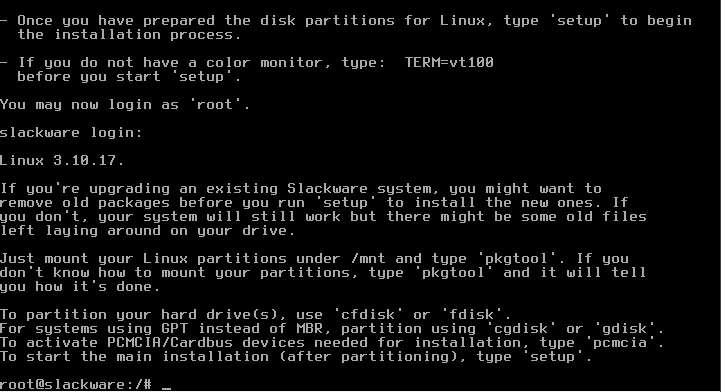
slackware64_partition

I'm used to 'fdisk' so I just run the command: root@slackware:/# fdisk [path_to_drive] Command (m for help): n Partition type: p primary (0 primary, 0 extended, 4 free) e extended Select (default p) p Partition number (1-4, default 1): 1 First sector (2048-41943039, default 2048): 2048 Last sector, +sectors or +size{K,M,G} (2048-41943039, default 41943039): +2G Partition 1 of type Linux and of size 2 GiB is set Command (m for help): n Partition type: p primary (0 primary, 0 extended, 4 free) e extended Select (default p) p Partition number (1-4, default 2): 2 First sector (4196352-41943039, default 4196352): 4196352 Using default value 4196352 Last section, +sectors or +size{K,M,G} (4196352-41943039, default 41943039): 41943039 Using default value 41943039 Partition 2 of type Linux and of size 18 GiB is set Command (m for help): t Partition number (1-4): 1 Hex code (type L to list codes): 82 Changed system type of partition 1 to 82 (Linux swap) Command (m for help): a Partition number (1-4): 2 Command (m for help): w The partition table has been altered! Calling ioctl() to re-read partition table. Syncing disks. root@slackware:/#

After partitioning, run 'setup' to start the setup program.

Addswap:
This enables a selected partition as swap partition. In my case, it's /dev/sda1. The swap partition is an independent section of the hard disk used solely for swapping. Swapping is the process whereby a page of memory is copied to the pre-configured space on the hard disk to free up that page of memory. The combined sizes of the physical memory and the swap space is the amount of virtual memory available.

Linux installation partition:
Next step is to select a partition to install root Slackware files. In my case, I have only one partition to select, /dev/sda2.

Format partition:
Select "Format" to format above selected partition.

Select filesystem:
I choose ext4 filesystem. Ext4 is an advanced level of the ext3 filesystem which incorporates scalability and reliability enhancements for supporting large filesystems (64 bit) in keeping with increasing disk capacities and state-of-the-art feature requirements.

Source media selection:
Select "Install from a Slackware CD or DVD.

Package selection:
I choose the default selection.

Select Installation mode:
I choose "full" to install everything.

USB flash boot:
After the packages installation, it'll ask you whether you want to boot from a USB device. This is surely an option if you don't use LILO or traditional boot loader, but I use LILO to boot the system so I skip this section by selecting "Skip".

Install LILO:
LILO is a Linux Loader which boots the Linux kernel. The setup program offers a few options here. "Simple" and "Expert". Simple installation automatically tries to identify installed OS(es) and enables you to choose. "Export" installation allows you to edit the lilo.conf file. Since I'll have only one OS on this system, the simple method suffices.

Select frame buffer console for LILO to use:
I do not much care about the frame buffer console so I choose the standard.

Kernel parameters for LILO
No extra parameters are needed.

UTF-8 text console
I choose "No".

LILO installation location:
There are a few options here but since I don't have any other OS, it is safe for me to install LILO in the MBR.

Mouse configuration:
I use a USB connected mouse so my choice here is "usb".

Network configuration:
From here on there are questions for network configuration, such as hostname, domain name, network type (DHCP, static IP, etc).

Start-up services:
Default selection

Hardware clock:
The hardware clock is set to the current local time so my selection here is "No".

Timezone configuration:
I select "US/Eastern" here.

Default window manager for X:
Although I know I'm going to install Openbox for my window manager, I choose XFCE here. I used to like KDE but it's too fatty for me now. If you want, you can run 'xfwmconfig' to choose the default again.

Root password:
Choose some strong password for root.

DONE!
Now the installation of new Slackware is done. You can reboot the system and enjoy it.

If you'd like, you can follow my previous post, Slackware64 14: Post Installation Configuration.

That's all!
-gibb

Git Basics

I sometimes develop websites for personal interests or for friends. Since I'm the only one to work on them, I did not really pay too much attention on version control. But there was a small project that I worked for my friend, which required me to look into a version control system (because he who has no coding experience also wanted to help updating source codes).

I once tried to learn subversion but couldn't really get the hang of concepts of trunks, branching, etc... So, I didn't want to try subversion. Then I met git.

Disclaimer:
The information below is the result of my researches in the Internet and of my experiences. It is solely used for my purpose and may not be suitable for others.

Git First-time System Setup:

After installing, execute below commands to set up the system. This is done only one time: $ git config --global user.name "user-name" $ git config --global user.email user@email.com $ git config --global core.editor "gvim -f"

First-time Repository Setup

These steps are necessary each time a new repository is created. First, navigate to the root directory of the website/applicew repository: $ git init Initialized empty Git repository in /home/<username>/www/<project_name>/.git/

By default, Git tracks the changes of all the files, but we can use .gitignore that locates in the application root directory to control what to track. $ vim .gitignore ----------------------------------------- # Ignore bundler config /.bundle # Ignore the default SQLite database. /db/*.sqlite3 # Ignore all logfiles and tempfiles. /log/*.log /tmp # Ignore other unneeded files. doc/ *.swp * ̃ .project

More to come...!
-gibb

Slackware64: Qemu, KVM and Spice

On the other day, I wrote a bit about qemu-kvm and virt-manager. After the installation and configuration, I fired up virt-manager and Windows XP guest. Hmm... mouse movement is sluggish, moving a window leaves afterimage, and frequent freeze-up. Also, the sound doesn't seem to be working. A big disappointment.

With more digging, I found Spice. Spice (Simple Protocol for Independent Computing Environments) offers high-quality remote access to QEMU virtual machines. It's much like vnc, and is said to handle the sound better. Hmm... it sounds interesting and what's there to lose?

Disclaimer:
The information below is the result of my researches in the Internet and of my experiences. It is solely used for my purpose and may not be suitable for others.

Installation:

First of all, download the spice package and its dependencies from SlackBuils.org and install them.

Creating a VM and installing Windows XP:

Prepare a virtual disk $ qemu-img create -f raw winxpvm.img 15G

Install VM enabling Spice $ virt-install \ --connect=qemu:///system \ (Use Qemu) --name=winxpvm \ (Domain name) --ram=1024 \ (Allocate 1024MB for memory) --vcpus=1 \ (Number of virtual CPUs) --os-type=windows \ (Type of OS is Windows) --os-variant=winxp \ (OS Variant is Windows XP) --hvm \ (Use full virtualization) --virt-type=kvm \ (Hypervisor to install) --cdrom=/[path_to_windows_installation_iso] \ (Virtual CD-ROM device) --disk path=/[path_to_winxpvm.img] \ (Path to storage media) --graphics spice,port=9500,listen=127.0.0.1 \ (Use Spice protocol, port number and address to listen to) --video=qxl \ (Video device. Use 'qxl' for Spice) --channel spicevmc \ (Use spicevmc channel) --soundhw ac97 \ (Attach a virtual audio device. Use 'ac97' for Spice) --accelerate (Use KVM or KQEMU in this order)

Now open another console and type the following command $ spicec -h 127.0.0.1 -p 5900 -t winxpvm

By executing above command, it opens up another window with XP Installation.
spice_winxp_install

Spice Guest Tools for Windows:

On Windows guest system, go to Spice Download page and download Spice Guest Tools for Windows guest for better performance and integration with Spice.

Additional binaries can be downloaded from http://www.spice-space.org/download/binaries/

PolicyKit Setup:

PolicyKit allows for more flexible, fine grained access control to the libvirt virtualization layer. Since I wanted a regular user, me!, to be able to execute the virsh command, I configured PolicyKit.

That's all!
-gibb

slackware64: Installing qemu-kvm and virt-manager

I've been using VirtualBox for a while on my slackware box. It's been working ok but I recently read a couple of blogs/articles recommending KVM. They said that KVM is rapidly becoming the de facto standard for open source visualization. Interesting. So, I gave a shot with qemu-kvm with libvirt (for GUI).

Disclaimer:
The information below is the result of my researches in the Internet and of my experiences. It is solely used for my purpose and may not be suitable for others.

Terminology:

libvirt
libvirt allows management of different virtualization solutions such as KVM and Xen through a common (programming and user) interface.
virt-manager
A graphical virtual machine manager
KVM (Kernel Virtual Machine)
KVM provides full virtualisation and can run unmodified Linux or Windows images, but it requires CPU virtualisation extensions (Intel VT or AMD-V).
Qemu
Qemu functioning as a userspace, software-only emulation package. It can be used standalone (that is, it does not require a special kernel module, or CPU virtualisation extensions, or a hypervisor layer) and is capable of running unmodified operating system images.

Prerequisite:

The CPU needs to support virtualization in order to take advantage of qemu-kvm. To check, execute below command: $ egrep -c '(vmx|svm)' /proc/cpuinfo

If the CPU supports virtualization, you should get a non-zero value.

Or, as Daniel Berrange suggested, virt-host-validate to validate host virtualization setup: # virt-host-validate qemu QEMU: Checking for hardware virtualization: PASS QEMU: Checking for device /dev/kvm : PASS QEMU: Checking for device /dev/whost-net : PASS QEMU: Checking for device /dev/net/tun : PASS

Installation and Post-Configurations:

Install qemu-kvm, libvirt, virt-manager and their dependencies from SlackBuilds.org.

There are a few notes for post-configuration:

  • Configure libvirt for user group and permission:
    Create a group called libvirt and assign a regular user to it. Then, uncomment unix_sock_group and unix_sock_rw_perms from /etc/libvirt/libvirtd.conf # groupadd libvirt # gpasswd -a USER libvirt # vim /etc/libvirt/libvirt.conf ----------------------------------------- unix_sock_group = "libvirt" unix_sock_ro_perms = "0770" unix_sock_rw_perms = "0770"
  • Default user group for kvm:
    The qemu-kvm SlackBuild patches the installed udev rules so that you no longer are required to use the system group kvm as the default. The users group is set as the default
  • Start the libvirt daemon at boot:
    To start the ibvirt daemon at boot, add a following piece of code to /etc/rc.d/rc.local # vim /etc/rc.d/rc.local ---------------------------------------- # Start libvirt: if [ -x /etc/rc.d/rc.libvirt ]; then /etc/rc.d/rc.libvirt start fi

Now Virtual Machine Manager (VMM) can be executed via: $ virt-manager

That's all!
-gibb

Slackware64: Configuring IBus

A Happy New Year!
This is the first blog entry in 2013.

I have been using "scim" for Japanese input since I started using slackware. It's an ok input method framework, but I always felt a bit uncomfortable for some reasons. So, I looked for another option and found IBus. It looks like this framework will be replacing scim in the near future. So, I decided to give it a try.

Disclaimer:
The information below is from Linuxquestions.org and some tweaking. It is solely used for my purpose and may not be suitable for others.

First, install ibus, pyxdg, ibus-anthy, and ibus-qt from SlackBuilds.
Then, create a directory and a file in it: # mkdir /etc/X11/xinit/xinput.d # vim /etc/X11/xinit/xinput.d/ibus.conf --------------------------------------------- #!/bin/sh export XMODIFIERS="@im=ibus" export GTK_IM_MODULE="ibus" export QT_IM_MODULE="xim" # allow capslock remap xmodmap -e 'clear Lock' -e 'keycode 66 = F13' XIM=ibus XIM_PROGRAM=/bin/true XIM_ARGS= SHORT_DESC="ibus" LONG_DESC="ibus"

Then, create a symlink to ~/.xinputrc: $ ln -s /etc/X11/xinit/xinput.d/ibus.conf ~/.xinputrc

Add following statement in the autostart file (~/.config/openbox/autostart): ibus-daemon -rxd &

Log out and log back in. There should be a keyboard icon in the system tray. Now, move onto its configuration.

Run ibus-setup: $ ibus-setup

This command brings up the IBus Preferences window: General->Next input method: "Shift+Meta_L" Input Method->Select and input method->Japanese->Anthy Advanced->(check) Share the same input method among all applications

That's all!
-gibb