Category: Computer

FreeBSD 10 RC2, Installation and Configuration for OpenBox

On the other day, I ran below command to update the Arch Linux system on my notebook: # pacman -Syu

It seemed something went wrong and the system became non-responsive. After hard boot, it did not boot up anymore. I believe this was second time it happened to me. IMHO, Arch Linux is a good, solid operating system but I was a bit uncomfortable with its rolling release system. I'm more of "why fix if it's not broken?" type of a guy so I decided to change to another distribution.

I tried CrunchBang(#!) Linux and Debian but was not impressed much. Then I found FreeBSD. FreeBSD and I have a bit of history. It was my first UNIX-like system that I installed on my old Dell Dimension XPS system back in late 1990s. I remember that I drove to a book store in neighboring state just to buy a FreeBSD Handbook (ah~ those old good days...). Since then, I was on and off with FreeBSD.

Disclaimer:
The information below is the result of my researches in the Internet and of my experiences. It is solely used for my purpose and may not be suitable for others.

Installation:

Now let's get going. It welcomes you with text based installation screen with FreeBSD logo. FreeBSD_install_welcome
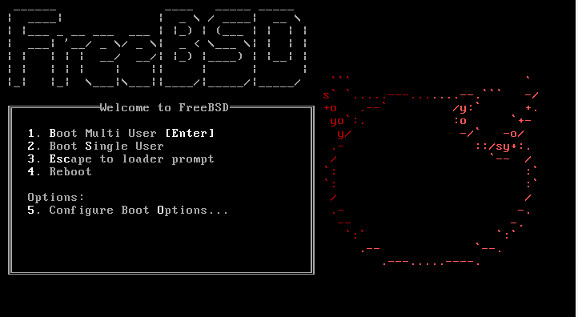
FreeBSD is moving to use 'bsdinstall' as default installer instead of 'sysinstall'. The installation is fairly simple and quick. Following is the components you can configure during installation:

  • Keymap Selection
  • Set Hostname
  • Distribution Select
  • Partitioning
  • Root Password
  • Network Configuration
  • Select local or UTC clock
  • Timezone Select
  • System Configuration
  • Add User Account
  • Final Configuration

After rebooting, a bare-bone installation of FreeBSD 10 is ready to go. As I said it is a "bare-bone" system. Most of software needs to be manually installed; this includes Xorg.

Portsnap: a Ports Collection Update Tool

Before installing Xorg, let's update the ports collection on the system: # portsnap fetch Looking up portsnap.FreeBSD.org mirrors... 9 mirrors found. Fetching snapshot tag from geodns-1.portsnap.freebsd.org... done. Fetching snapshot metadata... done. ... # portsnap extract /usr/ports/.cvsignore /usr/ports/CHANGES /usr/ports/COPYRIGHT ...

portsnap fetch downloads most up-to-date ports collection when executed for the first time. Thereafter, it only finds and updates as needed.

portsnap extract installs downloaded files. extract should be executed when portsnap is run first time. Anytime after, update should be used.

Xorg Installation

xorg can be installed as follows. During its installation, it'll ask a couple of questions/choices. I just take defaults: # cd /usr/ports/x11/xorg # make install clean

USB Mouse Configuration for X

On my HP Pavilion notebook, following settings /etc/rc.conf are needed for USB mouse or touchpad to work: # vi /etc/rc.conf ----------------------------------------- dbus_enable="YES" hald_enable="YES" moused_type="auto" moused_enable="NO"

[Edit 2/12/2014] Above settings in /etc/rc.conf is good enough for USB mouse but not for touchpad or synaptic device. To make it work, following setting worked for me. Add the following line in /boot/loader.conf: # vi /boot/loader.conf ----------------------------------------- hw.psm.synaptics_support="1"

OpenBox Installation

Install openbox and other software from the ports collection: # cd /usr/ports/x11-wm/openbox # make install clean

obconf helps installing new themes: # cd /usr/ports/x11-wm/obconf # make install clean

obmenu is a menu editor designed for openbox. I don't particularly use it but I install it just in case when I need to use it: # cd /usr/ports/x11-wm/obmenu # make install clean

lxappearance is a GUI GTK theme switcher, GTK deals with the contents of a window, icons, background window color (but not the title bar - use obconf for that): # cd /usr/ports/x11-themes/lxappearance # make install clean

Tint2 is highly customizable, lightweight panels and taskbars: # cd /usr/ports/x11/tint # make install clean

conky is a free, light-weight system monitor for X, that displays any information on your desktop. Conky is licensed under the GPL and runs on Linux and BSD: # cd /usr/ports/sysutils/conky # make install clean

nitrogen is a fast and lightweight desktop background browser and setter for X windows: # cd /usr/ports/sysutils/nitrogen # make install clean

Sudo (su "do") allows a system administrator to delegate authority to give certain users (or groups of users) the ability to run some (or all) commands as root or another user while providing an audit trail of the commands and their arguments.: # cd /usr/ports/security/sudo # make install clean

rxvt-unicode is a terminal emulator: # cd /usr/ports/x11/rxvt-unicode # make install clean

Edit .xinitrc to start openbox-session: $ cat > ~/.xinitrc exec openbox-session ^D

Now follow my another post, Openbox: Customizing to My Liking

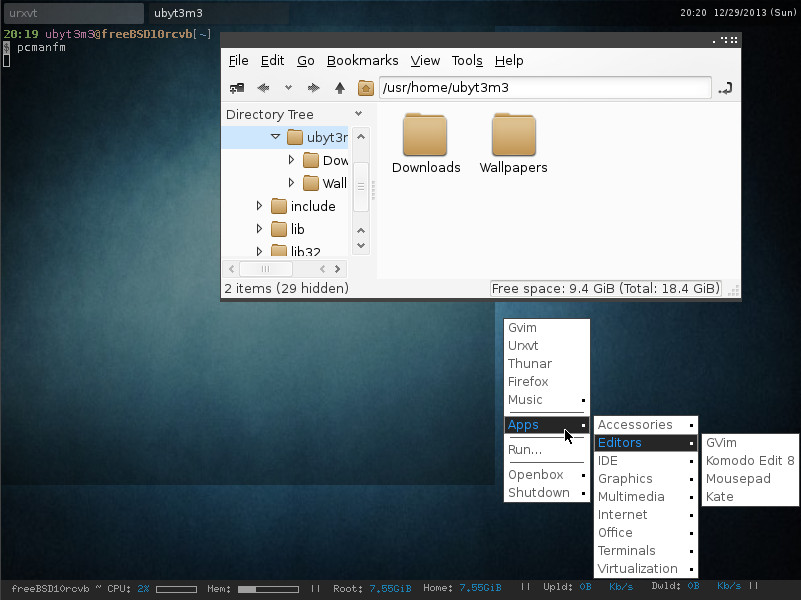
Voilà! Here is a screenshot of my new system: FreeBSD_OpenBox
That's all!
-gibb

Slackware64: Installing Openbox on Slackware64 14.1

Continued from my previous post, Slackware64: Installing Slackware 14.1, I'm going to install Openbox as my default window manager. And this is how it looks in vm client

slacky64

Disclaimer:
The information below is the result of my researches in the Internet and of my experiences. It is solely used for my purpose and may not be suitable for others.

To install Openbox and other packages, visit SlackBuilds.org. Slackbuilds.org offers the collection of slackbuild scripts. A slackbuild script is just a shell script which contains none of the code from the application it is going to install. Its only purpose is to help you build a Slackware package, which you can then install using 'installpkg' or 'upgradepkg'.

Now let's get going...

Installation of Openbox:

First, download the source and slackbuild for openbox: $ cd Downloads/ $ tar -xzvf openbox.tar.gz ... $ mv openbox-3.5.0.tar.gz openbox/; cd openbox $ su # ./openbox.SlackBuild ... # installpkg /tmp/openbox-3.5.0-x86_64-1_SBo.tgz ... Executing install script for openbox-3.5.0-x86_64-1_SBo.tgz Package openbox-3.5.0-x86_64-1_SBo.tgz installed. #

Now, exit X, run 'xwmconfig' and choose xinitrc.openbox-session. Then start X again. I use openbox-session because this executes the 'autoscript' script when Openbox starts. 'autoscript' contains programs that are executed at start-up. At any rate, this time, your X Window is running Openbox. $ startx

slacky64_openbox

Don't be surprised if you see only blank screen. By default, openbox does not offer desktop icons, task bar, etc. But this means its customizable as you like.

obconf:

ObConf is a GTK+ tool to assist with the configuration of the Openbox window manager (from slackbuilds.org).

lxappearance:

LXAppearance is the standard theme switcher of LXDE. Users are able to change the theme, icons, and fonts used by applications easily (from slackbuilds.org).

tint2:

tint2 is a simple panel/taskbar intentionally made for openbox3, but should also work with other window managers.

The goal is to keep a clean and un-intrusive look with lightweight code and compliance with freedesktop specifications (from slackbuilds.org).

Requirement: imlib2

conky:

Conky is a system monitor for X originally based on the torsmo code. Since it's original conception, Conky has changed a fair bit from it's predecessor. Conky can display just about anything, either on your root desktop or in it's own window. Conky has many built-in objects, as well as the ability to execute programs and scripts, then display the output from stdout (from slackbuilds.org).

nitrogen:

Nitrogen is a background browser and setter for X windows (from slackbuilds.org).

Requirement: gtkmm, mm-common, atkmm, pangomm, cairomm, glibmm, libsigc++

rxvt-unicode:

rxvt-unicode is an enhanced version of the rxvt terminal emulator. It has full unicode and Xft support, does font antialiasing and italics, and has the same transparency capabilities as ATerm. It can be extended using Perl. (from slackbuilds.org).

Now follow my previous post, Openbox: Customizing to My Liking

That's all!
-gibb

Slackware64: Installing Slackware 14.1

Long waited new version of Slackware 14.1 was released a few days ago (11/07/2013). I also read a report from Alien Bob about this new version and it looks promising as ever!

Here is a screen shot of my slackware64 14.1 in vm client

slacky64

Disclaimer:
The information below is the result of my researches in the Internet and of my experiences. It is solely used for my purpose and may not be suitable for others.

Installing Slackware64 14.1

The installation of this version of Slackware is pretty much the same as previous ones. If you have ever installed Slackware before, there is no surprise. Slackware uses a non-graphical installer. If this is your first try, you may feel a bit overwhelmed but it is really easy to understand.

The most tricky part may be creating partitions with 'fdisk' or 'cfdisk'.

slackware64_partition

I'm used to 'fdisk' so I just run the command: root@slackware:/# fdisk [path_to_drive] Command (m for help): n Partition type: p primary (0 primary, 0 extended, 4 free) e extended Select (default p) p Partition number (1-4, default 1): 1 First sector (2048-41943039, default 2048): 2048 Last sector, +sectors or +size{K,M,G} (2048-41943039, default 41943039): +2G Partition 1 of type Linux and of size 2 GiB is set Command (m for help): n Partition type: p primary (0 primary, 0 extended, 4 free) e extended Select (default p) p Partition number (1-4, default 2): 2 First sector (4196352-41943039, default 4196352): 4196352 Using default value 4196352 Last section, +sectors or +size{K,M,G} (4196352-41943039, default 41943039): 41943039 Using default value 41943039 Partition 2 of type Linux and of size 18 GiB is set Command (m for help): t Partition number (1-4): 1 Hex code (type L to list codes): 82 Changed system type of partition 1 to 82 (Linux swap) Command (m for help): a Partition number (1-4): 2 Command (m for help): w The partition table has been altered! Calling ioctl() to re-read partition table. Syncing disks. root@slackware:/#

After partitioning, run 'setup' to start the setup program.

Addswap:
This enables a selected partition as swap partition. In my case, it's /dev/sda1. The swap partition is an independent section of the hard disk used solely for swapping. Swapping is the process whereby a page of memory is copied to the pre-configured space on the hard disk to free up that page of memory. The combined sizes of the physical memory and the swap space is the amount of virtual memory available.

Linux installation partition:
Next step is to select a partition to install root Slackware files. In my case, I have only one partition to select, /dev/sda2.

Format partition:
Select "Format" to format above selected partition.

Select filesystem:
I choose ext4 filesystem. Ext4 is an advanced level of the ext3 filesystem which incorporates scalability and reliability enhancements for supporting large filesystems (64 bit) in keeping with increasing disk capacities and state-of-the-art feature requirements.

Source media selection:
Select "Install from a Slackware CD or DVD.

Package selection:
I choose the default selection.

Select Installation mode:
I choose "full" to install everything.

USB flash boot:
After the packages installation, it'll ask you whether you want to boot from a USB device. This is surely an option if you don't use LILO or traditional boot loader, but I use LILO to boot the system so I skip this section by selecting "Skip".

Install LILO:
LILO is a Linux Loader which boots the Linux kernel. The setup program offers a few options here. "Simple" and "Expert". Simple installation automatically tries to identify installed OS(es) and enables you to choose. "Export" installation allows you to edit the lilo.conf file. Since I'll have only one OS on this system, the simple method suffices.

Select frame buffer console for LILO to use:
I do not much care about the frame buffer console so I choose the standard.

Kernel parameters for LILO
No extra parameters are needed.

UTF-8 text console
I choose "No".

LILO installation location:
There are a few options here but since I don't have any other OS, it is safe for me to install LILO in the MBR.

Mouse configuration:
I use a USB connected mouse so my choice here is "usb".

Network configuration:
From here on there are questions for network configuration, such as hostname, domain name, network type (DHCP, static IP, etc).

Start-up services:
Default selection

Hardware clock:
The hardware clock is set to the current local time so my selection here is "No".

Timezone configuration:
I select "US/Eastern" here.

Default window manager for X:
Although I know I'm going to install Openbox for my window manager, I choose XFCE here. I used to like KDE but it's too fatty for me now. If you want, you can run 'xfwmconfig' to choose the default again.

Root password:
Choose some strong password for root.

DONE!
Now the installation of new Slackware is done. You can reboot the system and enjoy it.

If you'd like, you can follow my previous post, Slackware64 14: Post Installation Configuration.

That's all!
-gibb

Getting git Working on Android Devices

I have this small project for my brother that I need to create backend functions for his website. But I haven't been able to work on it as much (or fast) as I'd like to since I'm always doing things away from my computer. I could bring around my notebook with me but it's not that convenient. Then I thought it would be nice if I could use my old-yet-still-functioning-good cellphone, thunderbolt, for coding and could share it with my other computers since I carry it with me all the time.

Bang! Why not! Then I started searching apps for editors, web servers, and version control, etc... Editor and web server were relatively easy to find. I decided to use Vim Touch for editor and AndroPHP for web server. A problem was with a version control app. I've used git for other projects so I wanted to use it for this but I couldn't find a suitable app. When I was almost giving up this whole idea, I realized that I had Terminal IDE and gave a try to see if it had git installed. Voilà! It had git installed.

Disclaimer:
The information below is the result of my researches in the Internet and of my experiences. It is solely used for my purpose and may not be suitable for others.

Getting its environment for git and remote origin:

The version of git on my cellphone is 1.7.8: $ git --version git version 1.7.8.163.g9859a.dirty

I have a remote repository at bitbucket.org and tied to clone it to my cellphone: $ git clone https://[username]@bitbucket.org/[username]/[reponame].git Cloning into '[reponame]'... fatal: cannot exec 'git-remote-https': Permission denied

Oops... it's not working. After googling, I found that Terminal IDE doesn't support HTTPS for authentication. That leaves me with SSH authentication.


Generating SSH Keys:
Terminal IDE comes with the command dropbearkey which is a relatively small SSH server and client that's capable of running on a variety of POSIX-based platforms. It's easy to create a new key: $ mkdir ~/.ssh $ dropbearkey -t rsa -f ~/.ssh/id_rsa This will create a passphrase-less pair of public/private keys. If the public key needs to be viewed later time, this command does the job: $ dropbearkey -y -f ~/.ssh/id_rsa


Configuring SSH:
SSH now needs to be mapped to a new key: $ vim ~/.bashrc --------------------------------- alias ssh='ssh -i ~/.ssh/id_rsa'

But git uses a bit different way to handle this: $ vim /data/data/com.spartacusrex.spartacuside/files/bin/ssh_git --------------------------------- #!/data/data/com.spartacusrex.spartacuside/files/system/bin/bash exec ssh -i ~/.ssh/id_rsa "$@"

Then make it executable: $ chmod 755 /data/data/com.spartacusrex.spartacuside/files/bin/ssh_git

And set an environment variable: $ vim ~/.bashrc --------------------------------- export GIT_SSH=~/bin/ssh_git

[Edit: I forgot to mention about registering the public key to Bitbucket]

Note: If you get No auth methods could be used error, most likely ssh is not loading your key or you forget to register the public key to your server (in my case bitbucket.org) $ ssh -T git@bitbucket.org ssh: connection to git@bitbucket.org:22 No auth methods could be used.

Before connecting to bitbucket.org, the public key must be registered to my account at bitbucket. To do so, convert the key to OpenSSH format: $ dropbearkey -y -f ~/.ssh/id_rsa | grep "^ssh-rsa" > ssh_key

Then, log into bitbucket.org. Go to AvatarManage accountSSH KeysAdd Key. Then copy the content of ssh_key file generated above. Once this is done, the connection should be successfully made.

Now restart Terminal IDE and try to connect to bitbucket.org:

$ ssh -T git@bigbucket.org logged in as [username]. You can use git or hg to connect to Bitbucket. Shell access is disabled.

Good. That means it's successfully connected to the server.


Cloning my repository:
First create a directory where I can clone my repository into: $ ln -s /mnt/sdcard/www www && cd www

Then clone it from my account at bitbucket.org: $ git clone git@gitbucket.org:[username]/[repository_name].git


Setting up the environment for git:
Let's configure git: $ git config user.name "[username]" $ git config user.email "[username]@[server]"

Git is a very versatile tool and it has some very versatile ways to be configured: $ vim ~/.bashrc --------------------------------- export GIT_AUTHOR_NAME="[username]" export GIT_AUTHOR_EMAIL="[username]@[server]" export GIT_COMMITTER_NAME=$GIT_AUTHOR_NAME export GIT_COMMITTER_EMAIL=$GIT_AUTHOR_EMAIL

With all of this, my old-but-trusting thunderbolt becomes my primary coding device!

That's all!
-gibb

Git Basics

I sometimes develop websites for personal interests or for friends. Since I'm the only one to work on them, I did not really pay too much attention on version control. But there was a small project that I worked for my friend, which required me to look into a version control system (because he who has no coding experience also wanted to help updating source codes).

I once tried to learn subversion but couldn't really get the hang of concepts of trunks, branching, etc... So, I didn't want to try subversion. Then I met git.

Disclaimer:
The information below is the result of my researches in the Internet and of my experiences. It is solely used for my purpose and may not be suitable for others.

Git First-time System Setup:

After installing, execute below commands to set up the system. This is done only one time: $ git config --global user.name "user-name" $ git config --global user.email user@email.com $ git config --global core.editor "gvim -f"

First-time Repository Setup

These steps are necessary each time a new repository is created. First, navigate to the root directory of the website/applicew repository: $ git init Initialized empty Git repository in /home/<username>/www/<project_name>/.git/

By default, Git tracks the changes of all the files, but we can use .gitignore that locates in the application root directory to control what to track. $ vim .gitignore ----------------------------------------- # Ignore bundler config /.bundle # Ignore the default SQLite database. /db/*.sqlite3 # Ignore all logfiles and tempfiles. /log/*.log /tmp # Ignore other unneeded files. doc/ *.swp * ̃ .project

More to come...!
-gibb